Saturday 29 February 2020

Candle Decorating


Hello Friends i hope you are all well! 

I would like to share a candle with you that i have decorated using a napkin/serviette.
This is a really easy cost worthy way to add decoration to your home and  it looks beautiful .


Materials used;

-   Plain white wax candle
-   Napkin/serviette
-   Baking paper or parchment
-   Heat gun
-   Scissors


Here is how you make it.


Take a serviette/napkin of your choice and seperate the layers to leave yourself with just one! (this is the layer with the image on) I have used an image of a rose on my candle, there are lots of beautiful napkins that you can choose from, i am sure that you will find something you love to use on yours  that will tie in with your home decor.

Cut around the image that you are going to use and position it on your candle. Using a piece of baking paper (large enough to wrap around and a little for you to hold on to) place this on top of your candle holding the two ends around the back with one hand. Using your heat gun with the other hand gently heat just over the image, you will see the wax melting and adhering the napkin to your candle, be careful not to over heat, move your heat gun along as soon as you see a change.

Remove the baking paper from your candle and you will see your image transferred perfectly.

I hope your enjoyed my project, thank you for stopping by my blog today!

Hope to see you soon.


Wednesday 26 February 2020

One for the Guys


Hello again friends how are you all today!

Today i would like to share a card that i have made for the men in our life.
I have used my Hearfelt Creations Wilderness Retreat Paper pad and Dies to make it!.


Here are the materials i used;


-   HCDP1-2108   Wilderness Retreat Paper Pad
-   HCD1-7270   Create a Scape Nature Die
-   HCD1-7268  Create a Scape Wilderness Die
-   HCD1-7263  SwirlyAccent Spray Die
-   HCD2-7191   Intricate Swirl Frames Die

Other items used were red card stock, white card stock, twine, glue, die cutting machine, paper trimmer, foam sticky pads, button. 


Here is how i made my Guy Card.

Cut down a piece of kraft card to 5 3/4 x 5 3/4" trim down slighty a 6x6 decorative paper panel from the pad to fit, glue this on top of your kraft card. Using the outer die from swirly accent spray cut from red card and the same from the check, glue the check piece on top placing it slightly lower than the red card so it leaves a little border. Now take the decorative part of the die and cut into kraft card, glue this on top of  the check paper. Cut the deer and the eagle images from the paper pad using the matching dies, cut a white decorative piece from the intricate swirl frames and a smaller decorative piece from the pad to fit on top using the smaller die, glue in place and fix the eagle on top of this! (you can bend the eagles wings to create dimension). Cut a tag shape from red card with layer of kraft and the smaller decorative panel from the pad, glue your white swirly piece at the top, add twine and a button. Cut two corner pieces from red card and kraft card and glue in place as shown, make two flags either side of your card and raise a little with sticky pads, (do not put the pads to near the v cuts of your flag shapes as your tag will slide into here.) Wrap some twine around the piece that you are going to put at the bottom of your card, glue your deer image on top, trim the sides to fit within your main panel, raise sligthy at the sides so that your tag slips inside, glue down and slide your tag in place, finish off decorating the inside of your card with paper cut to fit and another panel from the pad and your all done!.

Thank you for stopping by my blog and i hope you enjoy my project!!

If you get chance please vote for your three favourites 😊

https://www.heartfeltcreations.us/blog/15-joyful-springtime-paper-crafting-ideas


See you soon. 


Saturday 22 February 2020

Easter Dinning Table


Welcome to my Blog Friends!

Today I would like to share another passion of mine which is sewing and making decorative pieces to use in my home. I have made some cute little cutlery holders to display on my easter table.


Add caption


These are simple to do! Here are the materials I used to make them;

-   Linen fabric
-   Matching thread
-   Lablanche easter iron on transfers
-   Lace
-   Gingham Ribbon   
-   Wooden buttons

Other items used;

Sewing machine, needle, pins, tape mearure. iron,

Here is how I made them;

First of all set your sewing machine ready with the chosen thread that you will be using. Cut to size your linen fabric 15.5"x 5". (If you would like to add an interfacing to stiffen your holders, do so by doing a double thickness of fabric and inserting this between the two layers). Sew a 1cm border all the way around your fabric on your sewing machine (this will prevent you fraying your fabric to much). Take your lace and sew along the top underneath your 1 cm border ( See picture for reference.) Fold the bottom half of the fabric back on to itself to make a 5.5" pocket to place your cutlery in, press with an iron and pin in place. Using the the sewing machine sew on the three sides, leaving the bottom and the pocket part remove your pins as you go. Fray all the edges shown by taking a sewing needle and  pulling the fibres away as shown. Now place your chosen transfer and iron in place. Make a bow using your Gingham ribbon and sew along with a button on your design. 

Hope you enjoy making these for your easter table!

Have fun see you soon.

Wednesday 19 February 2020

Pop Out Card

                                 
Happy Wednesday friends welcome to my blog!


Today I would like to share with you my pop out card.


For this project you will need;

- Two 6x6 card blanks
-  Glue
-  Scissors
-  Ruler
-  Pencils
-  Scoring tool
-  Bone folder
-  Decorative papers etc


To make this card start out with one of your card blanks and trim It down to 5 3/4" (this helps the card to close neatly when finished) this will be your Insert with the pop out part, cover with decorative papers. Now starting on the outside of the Insert 0n the folded edge measure down from the top 1 1/2" and mark with a pencil, do the same from the bottom of the card, now measure Inwards from the fold 1 1/2" and mark In several places, using your ruler and pencil draw a straight line through your marks, turn your card and draw In the lines as shown In red in the picture) then cut with scissors. You will see that I have highlighted In green the area where you will need to score (from A to B only) fold and score your edges with a bone folder on the front and back of the card (your score lines) push this part through to the front to make the pop out.
Take your outer 6x6 card and decorate the Inside, It Is best to do this as you can see the card from the pop out area, now glue the Inner card to the Inside of the outer card making sure you do not glue the pop out part. Now you can decorate your card how ever you like! 

Hope you find my tutorial helpful!

See you soon.


Monday 17 February 2020

Grannys Window Easel Card


Hello friends! On my blog today is an Easel card that I have made! I am calling it Granny's Window! It reminds me of my wonderful grandmother, who always had a pot tea on the table waiting for you when she knew when you were going to visit! and when you looked through her kitchen window you would see most beautiful garden full of flowers!


Materials used;


- HCCB1-481 6X6 Round bi-fold card
- HCDP1-2112 Tea time paper collection
- HCD1-7287 My cup of tea die
- HCPC-3904 my cup of tea cling stamp set
- HCD1-7213 Elegant pocket accents die
- HCD2-7190 Frame a card leafy borders die
- HCD1- 7275 Calla lily die
-HCD1-7110 Classic rose die
- HCD1-7222 Cheery pansy die


Other Items used; Gemini die cutting machine, guillotine, scissors, glue, hot glue gun and glue, white card stock, gold embossing powder, heat gun, versamark ink pad, victorian velvet oxide pad, alchol markers, green and white acrylic paint, paint brush, sponge dauber, stamens, crystal glitter, pink polka dot ribbon, plum nuvo drops.

Here is how I made my easel card;


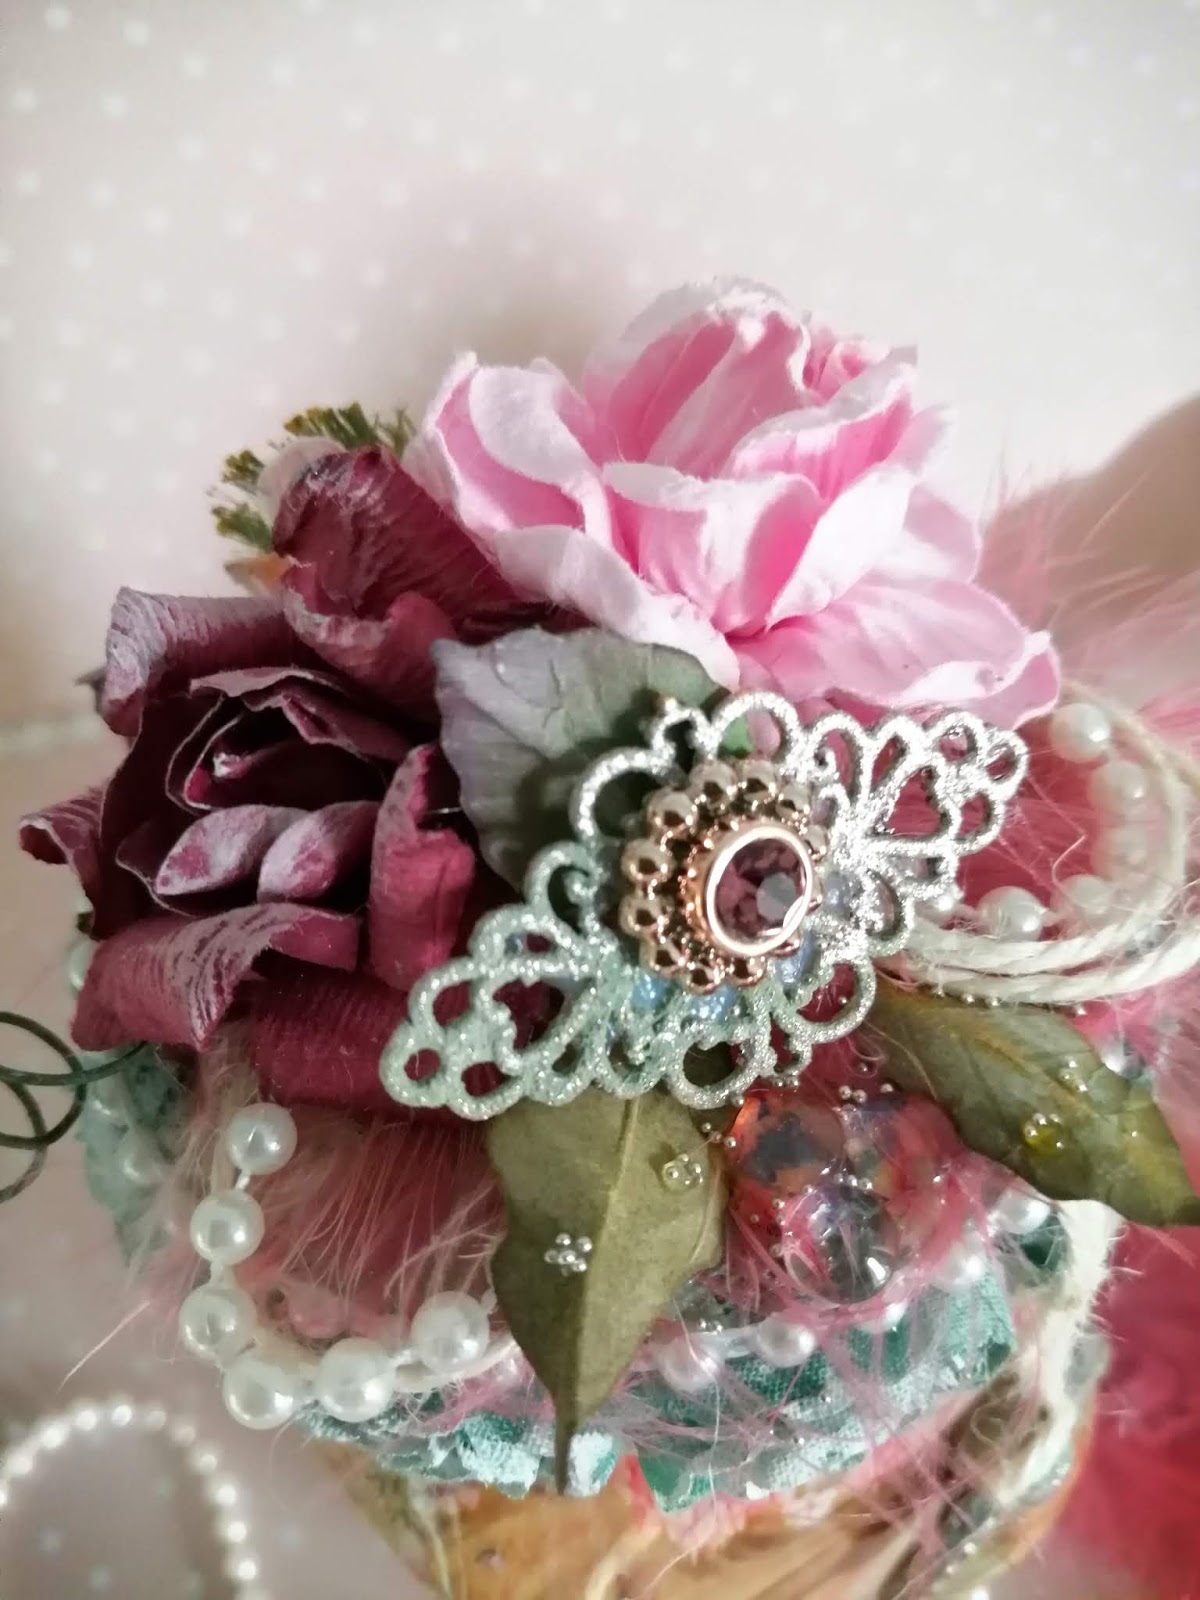
First of all I cut coloured and created my flowers and leaves using the above dies, my leaves were painted two tone with green and white acrylic paint using a paint brush.

You will need to take the 6x6 round bi-fold card and cut one complete circle away from it, fold and score again on the one side to create the easel, then take one of the 6x6 paper panels from the tea time paper collection and glue it to some white card stock, cut down to size, glue this to the folded easel card making sure you only put glue on the bottom half.  Next cut four decorative die cuts from white card stock using the Frame a leafy border die, glue into place as shown (cut away the bottom two dies as shown to create the curtains) tie two bows from the polka dot ribbon and glue in place with hot glue to create curtain tie backs. Cut four die cuts from the elegant pocket accent die using white card stock (I cut two pieces of card at the same time so that the second die cut stayed complete you will have to test this out according to your cutting machine) I then coloured the bottom piece with a victorian velvet oxide ink, and glued in place the remaining two white die cuts on top! glue one piece at the, top of the card.
Next you will need to cover the bottom of your easel card with decorative paper and glue the other elegant pocket die cut in place. Now take your tea cup stamp, ink it up with versamark ink, stamp out the image, sprinkle gold embossing powder on top and use your heat gun to emboss it, colour with victorian velvet oxide ink and a sponge dauber, use the corresponding die and cut the image out, glue this to the bottom right hand side. Now arrange your flowers and leaves and glue in place using a hot glue gun (make sure the flowers glued at the bottom will not effect the opening and closing of your card). Now finish your card by adding glitter and nuvo drops to your flowers!


Hope you enjoy making my easel card!
See You Soon.


Wednesday 12 February 2020

Paper Mache Easter Egg


Hello friends, Welcome to my blog!


Today I am sharing with you a little altered paper mache egg that is a fun decoration you can make for Easter! 


Materials used;

-  Paper mache egg
-  White gesso
-  Pentart lasur gel in ivory
-  Viva decor white chalk paint
-  Pentart dekor paint soft in patina green
-  LaBlanche easter decoupage sheet
-  Viva decor decoupage glue
-  13 arts gel medium
-  Resin Scrolls
-  Miniture birds nest
 -  Miniture eggs 
-  Sisal
-  Pentart Antique copper paste
-  Resin flower
-  Lace
-  Twine

Other items used, heat gun, hot glue gun, paint brush, scissors, a damp sponge and a spatula.


This is how I made it, first of all I took the undecorated paper mache egg and gave a coat of white gesso which I dried off with the heat gun, followed by a coat of white chalk paint. I painted the inside of the egg in Patina green. I then cut out my images from the easter decoupage sheet and applied decoupage glue to the back of the image and also on to the egg, I put the images in place and brushed over lightly with the glue and dried off again. I then applied the Lazur gel and with a damp sponge took some of the stain off (this is called knocking back). I once again dried the egg off and then it was time to decorate. I attached  the lace and a twine bow using hot glue followed by the resin flower and scrolls (that I had previously painted in Patina green) using the gel medium and a spatula. I glued in a small amount of the Sisal inside the egg followed with the minature bird nest and eggs. Finaly I used the antique paste on the inner edges, resin pieces, and the minture eggs inside. 

Hope you enjoy making my decorative easter egg!

See you soon.

Sunday 9 February 2020

Lablanche shadow box


On my blog today is a shadow box that I have made using the beautiful cottage paper collection from Lablanche, I love working with anything vintage !


Here are the materials I used to make my shadow box.


- 8x8 shadow box
- Lablanche cottage paper collection
- Sage chalk paint
- White chalk paint
- White Gesso
- Pentart Antique copper paste
- Vintage photo distress ink
- Blending tool
- Resin corner decorations
- Miniture brass clasp
-  Hot glue gun and glue
- Heat gun
- Gel medium
- Hessian fabric
- Collall 3d glue gel


So here is how I made it. First of all I made my shadow box up, I then painted my corner resin pieces with white gesso and dried them off using my heat gun. I attatched the pieces using gel medium on to the four corners. Next I painted the frame using white chalk paint followed by the sage to create a washed shabby chic effect, I dried the frame with the heat gun and added the antique paste to all of the edges including the resin corners. I then cut my 6x6 paper of the cottage scene and glued it into place in the centre. I glued a piece of hessian on top followed by one of the toppers that I coloured with vintage photo distress ink and a blending tool, I curled some of  the edges around my piercing tool, Using the glue gun I attatched the topper to the hessian making sure it was curved so that it was not flat and created dimension. I added the die cuts using 3d glue gel, and placed the gate to look  as though it was opening slightly, followed by a little sign hanging over it, I added an epoxy embelishment from the kit and the brass clip to the topper and this completed my project!.

I hope you enjoyed my shadow box.
See you soon.


Wednesday 5 February 2020

Shabby Chic Jar


On my blog today is my recyled jar using Lablanche shrink foils. I just love making things out of items you are going to throw out!


 Here are the materials I used to do it.

  -  Empty jar
-  Lablanche shrink foil for bottles and jars
-  Pot of hot water
-  Towel to dry
-  Silicone tongs
-  Heat gun
-  Chalk Paint in sage
-  White gesso
-  Paint brush
-  Hot glue gun and glue
-  Gel medium
-  Pentart rose gold wax 
-  Nuvo dries clear crystal drops
-  Twine
-  Flowers and leaves to decorate
-  Lace roses 
-  Pearl string
-  Pink Feather
-  Charms 
-   Glass cabochon


Here is how I made the jar.

First of all I made sure my jar was clean, I then put a pot of water and gently heated it until it was      hot enough for the shrink foil to work (it does not have to be constantly boiling) I then took the foil    of my choice and cut it to size, It has to be around 1cm larger than the top and bottom of the jar. Next  I took the jar holding the foil in place and dipped it a little into the hot water until the foil shrank to fit the bottom. Next I inserted the jar further in the water and shrank it some more. I dried the bottom with a towel then held it so that I could put the top of the jar in the water to shrink it all, (you will need to cut the excess foil from around the thread of the jar with a craft knife so that you can screw the lid on.) I used the same steps with the lid, holding the foil to the lid with tongs so that you do not burn your fingers. I painted the inside of the lid first with gesso and then the sage chalk paint and dried it with an heat gun. Now its time to decorate. First of all I glued the lace roses to the top of the lid as well as the pearl string using hot glue, I then  put a small amount of hot glue on top of the lid and attached the feather, next the loops of twine and pearls, I took a charm and painted it with white gesso then chalk paint and added Pentart rose antique wax, I did the same process for the metal charm on top of the lid. I cut a small image of a girl and used nuvo drops to glue it in place (this will dry clear) I also used the drops to fix the glass cabochon on top. I attatched some twine to the charm and also glued this in place on top followed by some flowers.The charms were fixed into place using gel medium it has a stronger bond than hot glue and is better I find for attatching metal pieces (it will dry clear). Next I took a brush with a small amount of gesso on and dry brushed over my lace roses and paper roses. Finally I added some Nuvo drops to my leaves and my jar was complete. I hope you enjoy my project !

See you soon.


Saturday 1 February 2020

Bird Cage Card


Hello again everyone!
Today I would like to share with you my card,
I am calling this card a birdcage card because it reminded me of one!!


Items Used; 

- Cottage garden hydrangea  collection
- A4 kraft card x2
- A4 white card x2
- Dries clear glue
- Collall 3d glue gel
- Versafine vintage sepia ink pad
- Rounded lattice window frame die
- Swirly border accents die
- Decorative oval die
- Windows hinges die
- Petite pocket accents die
- Day dream bridge die
- Elegant pocket accents
- Brown water colour pencil
- White chalk paint 
- Glitter
- Prills in ribbit
- Hydrangea flower mould 
- Flower moulding tools
- Paint brush
- Water
- Distress inks in peeled paint, worn lipstick, dusky concord, shaded lilac, tea dye and stormy sky.


So here we go !! This is how I made the card;

Take an A4 piece of kraft card and score in the middle then fold to make an A5 half fold card. Take a decorative paper of your choice from the cottage garden hydrangea collection, cut down to size slightly smaller than the card so that you have a border of kraft card showing around 1/4" smaller then glue into place. I then took the half circle without the lacey edge from the rounded lattice window die and placed on top of my card. I then drew around the curved edge with a pencil and trimmed my card down. Next I placed one of the smaller panels from the paper pad and glued it in the middle of my card. Then cut from Kraft card a decorative panel using the rounded lattice window die as shown and glue to the top of the card where you have cut to shape. Cut out the following from white card stock and glue in place;

- 1 die cut from petite pockets accents
- 1 die cut from decorative oval
- 1 die cut from elegant pocket accents

Take a 5" circle die and cut a window scene out then glue this ontop of the decorative oval die cut.
Stamp the cottage window image onto kraft card using vintage sepia ink pad, shade areas using a brown water colour pencil. Cut out the cottage window using the co-ordinating die. Glue the window in place at the bottom of the circle that you cut out, you should see a beautiful garden scene through the window! Now stamp your medium sized hydrangea and co-ordinating petals onto white card stock and colour with distress inks. Cut these out with the dies, then shape by hand or with the moulds. For the leaves, stamp and colour with peeled paint distress ink then white wash over with watered down white chalk paint. Score the leaves from the back with your flower moulding tool to make the appearance of veins. Using the 3d glue gel apply to the head of the cut out hydrangea and glue the petals in place and now glue this to the card. Stamp, colour and cut the birds image from the fresh cut hydrangea stamp and die. I coloured the birds with stormy skies and tea dye distress ink using a paint brush. Stamp colour and cut the little floral arrangement from cottage window and hydrangea stamp and die set, glue this in place. Cut from kraft card two hinges from the window hinges die and glue half on the front and half on the back of the card. Add swirly die cuts in kraft card and embellish your card with glitter. Lastly, decorate the inside of your card as shown with matching paper, panels and die cuts. Now stamp your sentiment in place .

Hope you enjoyed making my birdcage card ! 

See you soon x


Dressing Table Makeover

Hello everyone I hope you are all safe and well. My dressing table and chair needed a make over so i gave them a new lease of life!...